How to compress from iMovie with QuickTime 7

***** Stage 1: Share *****
a. In the Main Menu go up to File and in the drop down menu select "Share".

b. Select QuickTime and where it says "Compress movies for:" choose "Expert Settings".
c. Click "Share".
***** Stage 2: Options *****
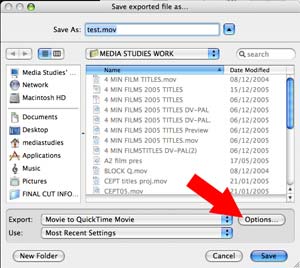
a. Name the movie.
b. Where it says "Export", make sure it says "Movie to QuickTime Movie".
c. Click "Options".
***** Stage 3: Movie Settings - Video Settings *****

a. Click "Video Settings".
b. Choose the "MPEG-4 Video" codec.
The MPEG-4 compressor window appears.
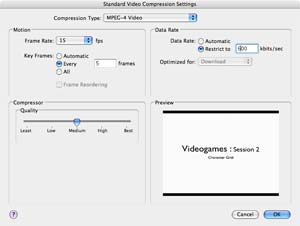
c. Set the frame rate to be fifteen (15) frames per second and the Key Frames every five (5) frames in the Motion options.
d. Keep the compressor settings at "Medium".
e. Set the Data Rate Restrict to six hundred (600) kbits per second.
f. Click OK.
***** Stage 4: Movie Settings - Size *****
a. Click "Video Size". (N.B. you won't touch the "Filter" settings).

b. Select "Use Custom Size".
c. Type three twenty (320) for the width and two forty (240) for the height (which is about half the size of what DV video is).
e. Click OK.
***** Stage 5: Movie Settings - Sound *****
a. Click "Sound Settings".

b. Set the format to "AAC".
c. Set the channel to "Mono".
d. Click on the "Show Advanced Settings".
AAC ENCODER SETTINGS
Bit Rate Format: Constant Bit Rate
Target Bit Rate: thirty two (32)
Precedence: Bit Rate
Quality: Better
e. Finally set the Rate to be twenty four (24) kilohertz.
f. Click OK.
***** Stage 6: Movie Settings - Prepare for Internet Streaming *****
a. Check the "Prepare for Internet Streaming" box.
b. Select "Fast Start".
***** CLICK "OK" TO COMPRESS YOUR MOVIE *****
Adapted from the tutorial at Freevlog.