SESSION 4 ::: OCR A Level Media Studies Conference ::: Thursday 16 March 2006
iStop-Motion Animation
This tutorial walks you through the basics of iStopMotion and guides you in shooting your first stop motion animation movie. So, go ahead and have fun!
Step 1: Starting up
Connect your camera to your computer (follow the instructions in the manual of your camera)
Launch the application by double-clicking the application icon.

After launching the application, a window will appear with the New Movie sheet over it.
Step 2: Creating the movie
In the Custom preset set the WIDTH to 720 pixels and the HEIGHT to 576 pixels. Then set the FRAME RATE to 12 fps (Frames Per Second).
Leave the Start Timecode by default.
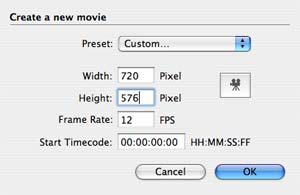
Click OK button to go on.
Now you should see the current camera live image displayed in the main window.
Step 3: Animation
Place an object in front of the camera.
Capture a frame, by clicking the Capture Button or pressing the space bar.

Animate the object. That means to move the object just a little bit, like it's demonstrated in the picture below.

Click the Capture Button again, if you think the object is right in place.
Repeat steps 3 and 4 until you have a small scene with about 40 frames, you should have over 3 seconds animation by now.
If this is your first attempt, notice that the smaler your movents of the objects are the smoother your animation will look when finished. The biggest mistake beginners do is capturing not enough frames. Always remember, that the result should look like a real motion, so if you displace the object to far, the motion itself won´t look like a "flow".
Step 4: Saving your work
Don't forget to save your movie! It might actually be a good idea to save your work on a regular basis. While iStopMotion has proven to be quite stable, every software can crash and make you loose your unsaved work.
Choose either Save from the File-Menu or press Command-S.
Give the movie a name, and choose a place where the movie should be saved.
Click the save button to save your movie on the disk.
Step 5: Export to QuickTime
File > Export to QuickTime...
Name and click Save, choose location etc.
Change the Movie Settings:
Video: Settings: Compression DV - PAL Frame Rate: 25
Uncheck the 'Prepare for Internet Steaming' checkbox.
Click Ok

Step 6: Import into iMovie to edit and to add sound effects, music, transitions and titles.
iMovie > File > Import
LINKS